 Written by: Sara & Colin 16 Days (September 1 - 16, 2017) and ~3,000 kilometers (~1,900 miles) driven... Southern Patagonia was majestic and stunning just as we expected, but Colin and I agree that it’s a very tough travel destination – so difficult that we’re conflicted on what to recommend. We’ll get into the reasons behind our conflicted recommendation in this post. Patagonia was one tough nut to crack on a budget and a bit of a letdown as a result. Hopefully with our information, you can do it better! This post has some personal commentary but focuses on sharing as much information, tips, and recommendations as we can remember them. When we were planning our road trip, we had trouble finding the information we needed, so we hope that this can help you with planning your own trip around Patagonia. If you’re interested in reading Sara’s personal thoughts about Southern Patagonia, she has written another blog post here on her blog, McPattons In Motion. For an additional visualization of our trip, check out our YouTube video here: Road Trip Montage Table of Contents
1. What is Patagonia?Patagonia is the name given to the southern tip of South America. If you draw a line a bit below Santiago, Chile to Buenos Aires, Argentina and close out the triangle with the tip of South America near Antarctica, that’s Patagonia. It covers some of the Andes mountains on the Pacific coast as well as endless plains until the Atlantic Ocean for a million square kilometers (620,000 square miles). There are only 2 million people in this whole area with fewer and fewer the further south you go. With such a sparse population, it can be tough traveling around with a limited traveler support network. And yes, the mountains there inspired the iconic clothing brand as well. 2. Where to goYou can cut Patagonia into two big pieces North and South of El Chaltén, or O’Higgins. The North has some gorgeous mountains, seascapes, and an adventurous 4-wheel drive road, the legendary Carretera Austral. Southern Patagonia, on the other hand, has the big name mountains and glaciers, is a little more populated, and has slightly better roads. To tackle either region, you must burn multiple days for point A to B travel due to the huge distances, rough road conditions, lack of gas stations, and fickle border crossings and ferries. We targeted Southern Patagonia to hit the big names. We only had 16 days to work with so that let us go for a Patagonia Grand Slam – Mount Fitz Roy, Perito Moreno Glacier, Torres del Paine, and Tierra del Fuego. 3. Getting into PatagoniaFor a starting point, you pick between Chile or Argentina. We found that a general rule of thumb in South America is that flying within a country is substantially cheaper than flying between countries. As a result, if you are already in Argentina or Chile, the choice is easier to fly within your same country to either Punta Arenas, Chile or Ushuaia, Argentina. A wrench to throw into the equation is that Chile seemed to have a much more developed vehicle rental market. We heard of other travelers trying to rent vehicles in Rio Gallegos, Argentina, so that might be worth a shot too. We flew in from San Pedro de Atacama, Chile, so we chose Punta Arenas as our starting city. We were able to get cheap, albeit miserable, flights from San Pedro to Santiago to Punta Arenas. As a heads up, 3:00 AM flights are popular in this part of the world which leaves travelers homeless for a few hours until hotel and hostel check in times. 4. How long you needWe narrowed our plans to Southern Patagonia so we’ll only speak to this region that we are familiar with. I think you can cover Southern Patagonia in as little as 10 days either with an all-inclusive (expensive) tour or by renting a good car and having each day pre-planned. However, 2 to 3 weeks is more reasonable and gives you some recovery time after long drives and hikes as well as time for multi-day backpacking treks. The more budget oriented you are, the longer it’ll take to travel around the region either by bus or hitchhiking (reasonably safe and not uncommon). 5. How much it costsPatagonia is not cheap. We tried to keep our costs low, but we still went far over our budget. Keep in mind that we even went during the lower or early shoulder season when prices at hostels, parks, and for rental cars are a fair amount cheaper. As stated previously, it seems cheaper to fly within the same country, so we flew from San Pedro de Atacama, Chile to Punta Arenas, Chile to start. To get out of Patagonia, we took a bus from Punta Arenas, Chile across the border to Rio Gallegos, Argentina and flew to Buenos Aires, Argentina. Here are our costs from the trip. This summary does not include the flights to and from, so don’t forget to add these in. It also does not include the few nights we spent in Punta Arenas before the rental period started (in case flights were delayed) and the night we spent after returning the vehicle, so don’t forget to add these in if applicable. If you’d like to see the details, you can access the Google Sheet here: McPattons' Patagonia Road Trip Costs.  6. Best time of year to visitThe weather in Patagonia is notoriously fickle. It’s common to hear that you’ll see all four seasons in the same day. We went in the first couple weeks of September which is very early in the tourist season. December through March is the most popular time of year to visit due to the summery weather, but peak season also commands the highest rates for food, lodging, transportation, and park entry. Visiting in September meant we had colder weather and some restaurants and hostels were still closed for winter, but we also had bigger discounts and fewer tourists. All in all, though it was cold and not all the trails were open yet, we thought this was a fine time to visit. We even got in some skiing in in Ushuaia, Argentina at the tail end of their season. One thing to watch out for but is likely unavoidable is that there’s a bug season in Patagonia. There are signs warning tourists of the biting flies that come out in January. Apparently, they can do some damage to your body so long sleeves and light colored clothes are recommended. Also, if you’re interested in seeing penguins or going to Antarctica, you should also check these seasons as well as they have tighter windows than December to March. 7. How to prepareThere are some great books out there and some that are a waste of time. Blogs are a great resource too but there aren’t many out there and we didn’t find any for camper vans! Pro tip: if you have Amazon Prime, you can check out digital books through their Kindle app like checking out books from the library! This means these expensive travel guides can be downloaded to your phone and laptop for free! Patagonia on a Budget by Matt Morgante – out of all the books we read, this was the most helpful with great summaries for general information and more targeted, helpful information for building a day-by-day plan with costs and recommended hikes. Fodor’s Travel Argentina – we tried Fodor’s since Lonely Planet has been striking out for lately for other locations. Fodor’s offers a very similar product to Lonely Planet, but they did have better recommendations and some handy maps. I’d recommend this one. Lonely Planet’s Chile and Easter Island – like other Lonely Planet guides, this gives you the basics but their recommendations for restaurants and tours are stale and should be taken with a grain of salt. I think there’s a negative effect for some restaurants getting recognized by Lonely Planet. Everybody travels with these guides and once a restaurant is in the book, the cat’s out of the bag and the location either gets overrun and can’t handle the volume of people or they get complacent and start to cut corners with their service because they know people will continue to be lured in by the book. We didn’t find a single good restaurant recommendation from this guide in all of Southern Patagonia. Backpacking in Argentina by Steve Hansich– a book compiled from a blog that’s geared towards folks who plan to backpack and camp. This book helped us to build an itinerary for places and times but didn’t offer much beyond that for our purposes. Backpacking in Chile by Steve Hansich – another book by the same author in the same style but annoyingly broken up between Argentina and Chile. Still a good source for building the itinerary but skimpy on details. 8. Odd things to bringSturdy, reliable wind and wet weather gear is a must. Patagonia was the windiest place we’ve ever been. The wind is relentless and gusts hard enough to push the metal walls of your car in day and night. Driving on exposed roads feels like you’re driving a boat in a strong current. The wind also picks up a lot of dust so a facemask or scarf and sun glasses were well used. Batteries do not hold up well in Patagonia. Bring outlet converters and splitters but consider leaving external battery packs at home. The big swings in temperature suck away your battery life and can turn external battery packs into bricks that won’t turn on or hold a charge. Try to keep your battery items warm to extend their charges. We slept with our phones under pillows… Also, in restaurants, the seats with nearby outlets are coveted. You’ll see people trolling restaurants looking for tables with outlets. If you are lucky enough to snag one, don’t hog it. One thing we found very useful for this trip is the Katadyn BeFree water bottle. We’ve been using them for the last couple of months and are obsessed! They are collapsible (so when they are empty, they take up very little room), and filter the water as you drink. We recommend getting one of them for any trip you take (especially if that trip is to a place where you can’t drink the tap water). Before these, we were spending a lot of money on bottled water because you aren’t supposed to drink the tap water in many of the countries we are traveling to. Not only was it expensive, but also unsustainable. Now though, we are using water from the tap and even water from streams and rivers in Patagonia to fill the Katadyn BeFree water bottles. P.S. We are not sponsored by Katadyn. We are just huge fans of the product, and they’ve made our lives easier and more sustainable. If you do end up buying one, use this Amazon link for it – we get a tiny kick back, and the price is the same as your regular Amazon purchase :)  9. How to get aroundSouthern Patagonia covers huge distances with no major cities, a lot of dirt roads, and frequent land and water barriers. To get around, your standard options are car, campervan, bus or hitchhiking. Flying around from city to city still requires bus or tour company transport from airports to the natural wonders so you might as well buy an all-inclusive tour instead. I think you could go for the Southern Patagonia Grand Slam in as little as 10 days but you’d need to have a fast car and everything pre-planned. And you’d surely have to buy the higher km/day packages from your vehicle rental company. If you choose the bussing route, you’d need to allot more time for transportation and assume a slower rate of progress and probably a minimum of 20 days. The campervan option is the middle route at about 16 days. Of course, you could factor in more adventures and relaxations at each destination and could easily double the duration of your trip. Hitchhiking probably takes about the same time as bussing. I read that it’s pretty safe to do in the region and not uncommon. We picked up a hitchhiker for one log leg of our trip and had some great conversation while on the journey. He was a police officer from the Canary Islands who had been hitchhiking for months around South America. We ended up climbing one of the mountains with him and one of his other hitchhiking friends the following day! There are whole books about hitchhiking in this region if interested. Buses run more regularly during the busy tourist season (November to March) but are fickle, somewhat unreliable, and make slow progress. It’s even worse during the shoulder season. If you bus, you’ll get stuck in odd places having to wait for the next day’s bus, but it’s certainly doable and just requires some additional patience and flexibility. We didn’t look much into the costs, but I think the cost of bussing can get close to a cheap car rental. Regarding car rentals, the cost was similar to the US ranging between $40 and $80 dollars per day depending on the size and 4-wheel drive capability of the car. Honestly, you’d be much more comfortable and capable in a higher clearance car on the numerous backroads in this region; however, these are substantially more expensive than small sedans. I’d still recommend going for a vehicle with higher clearance and not skimping here. You’ll spend many hours on teeth-chattering roads and your brain will appreciate it. Also, big gas tanks are hugely impactful. A tiny gas tank means you’ll waste hours driving to few and far between gas stations which takes away some of the flexibility you seek by renting a car in the first place. Campervans open even more flexibility but also new challenges. Expect to pay $100 or more per day to rent a camper van which is absurd but apparently the going rate. The benefit here is that you aren’t tied to spending the night in any particular location. Also, it mostly removes your lodging costs. Lodging in Patagonia is extremely expensive compared to other regions at $25 per person for a low-end dorm and $50 for a rough hotel. Romantically speaking, the world is your oyster with a campervan but sadly it isn’t as rosy as many towns and parks seem to not like campervans and make it a bit inhospitable to this type of traveler. Also as a heads up, some parks require you to buy a campsite for your campervan if staying in the park. We stayed in one such campsite that was $32 for one night. We chose a campervan for the excitement of the road trip, but in hindsight, we may have chosen to rent a vehicle and stay in dorms instead. 10. Info on our camper vanSee an overview of our camper van in a video here: Intro to the Camper Van! Choosing a van and rental company Chile has a more developed rental market with a few companies offering campervans. Wicked Campervans is the big name with locations around Chile and what seems like a lot of vehicles. Two others I could find were Soul Vans and Monkey Adventures. I reached out to all three and Soul Vans was the first to respond. Wicked Campervans never responded, and Monkey Adventures responded a week later to say they had no vans. Wicked Campervans has some pretty wild designs for their vehicles, so it’s impossible to fit into wherever you are traveling. Also, they are rather expensive with a lot of annoying add on fees. The daily rental fee is reasonable but then you add in fees for Argentina, extra cost for kilometers driven, 4% admin fees, and fees for picking up or dropping off the vehicle in areas that are inconvenient for them (seemed like everywhere). As a result, the fees essentially double their listed daily rental rate which made me sad. Soul Vans came in a bit cheaper with fewer fees so it felt better. Additionally, Soul Vans didn’t have absurd murals painted on the side of the van so we could draw less attention. For choosing a van, we narrowed our search to enclosed vehicles only. It was far too cold for a pop up tent style vehicle and the wind would’ve made us seasick rocking us back and forth in one of those roof tents! Originally, we’d requested a 2-person van but that ended up getting rented the day before we confirmed our reservation. Instead, we got a 3-person van that was really a 2.5 person van. The extra space got smaller and smaller over time…I’m glad we had the slightly larger vehicle. I would also not recommend it for 3 people unless you are very close and comfortable with each other. How Soul Vans (the rental company) performed Though Soul Vans was quick to respond, it didn’t mean they were easy to work with. It took over 20 emails to work out the rental and payment proved to be challenging. For example, in our correspondence, I’d mentioned how I was flexible with locations but they simply went with my basic suggestion I’d used to start our conversation which was to pick up and drop off the vehicle in Punta Arenas. I think they had to drive the van all the way from Santiago to deliver it to me and also may have driven it back afterwards. We flew right through Santiago and could’ve picked up the vehicle there instead of taking another flight. I was also concerned about getting charged for dropping off the vehicle in a different location from where I’d picked it up. Unfortunately, when the guy dropped off the vehicle to us in Punta Arenas, he asked in a surprised manner why we weren’t dropping off the vehicle in another location. I wish our long correspondence before renting the vehicle had covered this topic so that I could’ve worked with the company to pick up and drop off the vehicle where they needed it for a cheaper cost to everyone. Unfortunately, poor communication led us all to mediocre results. Payment was also challenging since their credit card machine was mysteriously not working. They wanted cash but I wasn’t comfortable withdrawing and walking around with over $1,000 USD in cash. Next, they wanted to transfer through a German bank account which is easier and more common in Europe but costly to the sender (me) and clunky from US accounts. We finally landed on PayPal as a reasonable payment method though it costs the recipient 2.9% (larger than most credit cards). The whole transaction was clunky because I think their office operation works with independent contractor/owners who rent out their vans – think Airbnb for campervans but on a very small scale. This adds another level to the telephone game further distorting communication between the vehicle owner and renting customer. Regrettably, I don’t think you’ll find much better. I don’t think the vehicle rental market is accustomed to dealing directly with end users / customers because they usually work with tour operators. My theory is that the majority of transactions go through middle men tour agencies and operators who build long trips, sewing together local contacts and cronies, where everybody gets kickbacks and the tourist pays top dollar for a smooth experience. Best of luck! Campervan discrimination Towns don’t seem to like campervans very much. Some, like El Chalten, isolate you to the outskirts of town in empty, exposed parking lots where the wind jostles you around all night. Others, like Puerto Natales, have kids shining flashlights in at night and trucks honking at you to move so they can take your parking spot. Be prepared to feel sleazy and sneaky. If you are able, try to rent a vehicle that isn’t so painfully obvious that it’s a rental car or van. However, if you drive a bit outside of town, there are often nice, secluded pull offs where other campervans have stayed before. Where to sleep in a campervan I searched with every permutation of phrasing in both English and Spanish to figure out where you are allowed to sleep in a campervan. The elusive answer is that in both Argentina and Chile, you are allowed to pull off and sleep anywhere that isn’t marked saying no campervans. However, I’ll refine this a bit later in our city-by-city section (because the “no campervans” areas are large in some cities) and list some areas that we found to be the safest with easy access to cafes or trees for when nature calls. Also, your worst enemy is the wind. It’ll rock your van around and jolt you awake like an earthquake. Our biggest priority for both cooking and sleeping was to find areas protected from the absurdly strong winds. Gas stations…gotta mark em all Fill up gas whenever you can even if you have half of a tank. We ended up starring every known gas station on Google Maps. However, also check the app, Maps.me, because there are a few other gas stations that aren’t listed on Google Maps. It’s so bad that we once had to drive 4 hours to get gas (2 hours to the town and 2 hours back into Torres del Paine park). Also, like New Jersey, people pump the gas for you. They like to top of your tank until the gas touches the nozzle, and the best term to remember is “llena” (pronounced jay-na) for “full”. Also, diesel is common so make sure you’re filling up the right gas type and are waiting in the correct line. Be prepared to wait in line for gas as the folks pumping take their sweet time getting to you, especially if they know you want to use a credit card. Be sure to have some Chilean and Argentinian cash for gas stations that say their credit card machine is not working. Specs for our Soul Vans campervan:
The rental includes:
11. Recommendations once you get thereCash problems As of 2017, Chile’s currency is rather stable but Argentina’s currency is tumbling with serious inflation problems. As a result, Argentine cash is very expensive because it loses value as it sits in your pocket and if you have extra when you leave Argentina, you’ll get crushed with the exchange rate. Exchange houses would prefer not to buy your Argentinian cash and you could lose 20% in an exchange from the Argentinian peso. ATMs charge absurd withdraw fees, sometimes up to 11% of what you try to withdraw. Also, many ATMs run out of cash on weekends and have very low withdraw limits ($60 for some in Argentina!). Hyperinflation hurts in Argentina. Businesses don’t really like credit cards, especially gas stations. It’s not uncommon for the “system” to be down meaning you must use your very expensive cash. Also, you may have to help people run their credit card machines. More than a few restaurants didn’t know how to use a chipped credit card. I believe every entry fee for parks and museums was cash only. As a foreigner, you get charged double and sometimes 10 times more than locals to enter parks and museums. This really left a bad taste in my mouth. Luckily, we were there during the very early season so many parks had discounted rates which jump up in the thick of tourist season (November to March). Be prepared to pay as much as $50 per person to enter some parks. Also, if you have one, bring a student id along even if it’s expired because you can sometimes finagle a discount on tickets. I don’t have a solution for the cash problem – only things that don’t work. Unfortunately, many big ticket items like hostels, car rentals, and guided tours require or strongly prefer payment in cash. Withdrawing a lot of cash is terribly expensive and tedious. Try to negotiate with companies for credit card or even Paypal. Money exchange stores have lazy hours so try to go during the core of the day (10 am till 4 pm) but you may arrive during their lunch break. Also, they’re closed all weekend. I know US dollars are valuable and I’d assume Euros and Pounds are as well. You can still get great exchange rates for US dollars in Buenos Aires on the “blue market” (not the black market but shady people on the street with wads of bills). Border crossings We crossed between Chile and Argentina 7 times in 2.5 weeks. Time varied based on whether you happen to show up with the big buses. It could take 10 minutes to 2 hours depending on the buses. Pass them on the connecting dirt roads if you can! You cannot bring any dairy, fruits, vegetables, or meat with you into Chile. If traveling by van, they may open up the van and look in coolers and drawers. If you are on a bus, they often require you to send your luggage through a scanner. We heard that they sometimes have dogs too to sniff for produce but never saw any. Canned foods and professionally packaged items like granola bars are fine. Argentina doesn’t care. Some border offices have 2 steps (migraciones = immigration and then aduanas = customs), and some of them have 3 (in addition to immigration and customs, they also inspect your vehicle). Still others don’t require exit stamps and breeze you through. We never figured it out. Your vehicle needs special documents to travel between countries that demonstrate proper insurance coverage. The rental company should provide these for you at an additional cost (a cool $100 USD) and they need bunches of stamps and everybody wants to see them at each border crossing. Sometimes you need to show a contract or voucher for the vehicle. We showed one on our phone that looked like this: 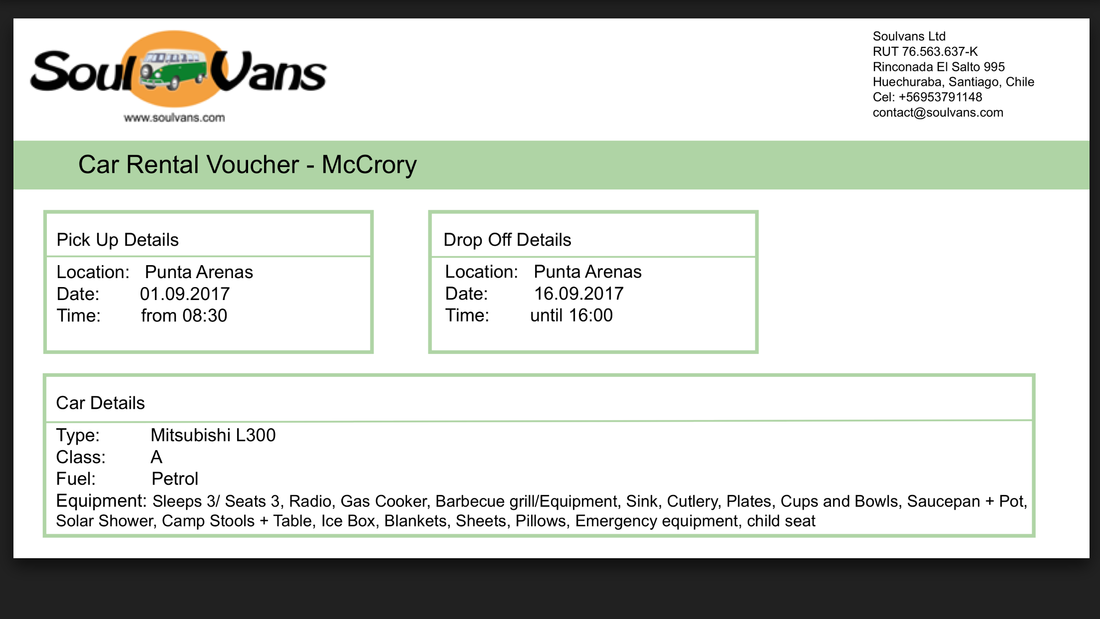 There is typically a building where you exit the country you’re in and then you drive on a long no man’s land dirt road to a second building where you enter the country you’re going to. A few times we thought it seemed like we had missed the building because the dirt road was so long. I do wonder what nationality all of the sheep were in no man’s land. Hikes and other adventures Patagonia is known for its hikes. Additionally, a legion of tour companies have created all sorts of side adventures to do besides hiking. Within the towns, you can also find some neat small-time museums with truly weird content. We’ll go into each of the big hikes, adventures, and museums in our city-by-city section. Overall, hikes in the main parks, Los Glaciares and Torres del Paine, were rather unimaginative out and back hikes that take all day and generally just go straight. Trail maintenance is low so be prepared for some significant slogging in the mud. Each trail we did pretty much went straight out to the lake or overlook with very few viewpoints or good stopping areas along the way. They’re boring hikes unfortunately, even for Colin who touches nearly every tree he walks by. The hikes to the big viewpoints are great but then you have to slog back on the same trail after all the trails have melted and muddied up. Additionally, due to the Spartan trail design, you traverse a lot of rolling hills so though the total elevation change to the viewpoint may be small, you end up climbing a lot more than the book says. We had some half marathon distance days! Adventures such as iceberg boats, penguin expeditions, and even downhill skiing abound for those with a bigger budget. And museums make for good rainy day options or activities when parks surprise you with unposted closures. 12. Day-by-day itineraryTotal distance driven: ~3,000 kilometers (~1,900 miles) Day 1
Day 2
Day 3
Day 4
Day 5
Day 6
Day 7
Day 8
Day 9
Day 10
Day 11
Day 12
Day 13
Day 14
Day 15
Day 16
13. City-by-city guidePunta Arenas Punta Arenas is a fine place to start with a good airport, well connected bus lines, and decent outdoors stores and groceries. We flew into here from San Pedro de Atacama in the far north of Chile. Oddly enough, it was cheaper for us to book two separate flights in and out of Santiago rather than 1 booking straight from San Pedro to Punta Arenas. Look at this option if applicable. Adventure Punta Arenas has a few penguin colonies nearby which start to fill up with birds in October. We were there too early in the season to see these guys unfortunately, but it’s a must see if you’re there during the right season! There are a few small museums in Punta Arenas but they aren’t worth going out of your way to see – just fine for killing time. Food There are some more diverse options in this town! Restaurants here won’t knock your socks off but there are at least some diverse options like Chinese, Italian, and Thai. Lodging Hostels in Punta Arenas are rough. They’re very expensive and very run down. Airbnb is a better option if you’re in town overnight. Campervan This city has mostly paid parking on streets. Parking along the waterfront is free (no signs saying “concesionado”) but this area is very windy. Some streets one row in from the water are also free so snag one of these spots and it’s still walkable to most of town where you’d want to be. Transit to El Calafate Driving from Punta Arenas to El Calafate – crosses the border from Chile to Argentina (Estimated at 10 hours with a stop for lunch depending on the border crossing)
El Calafate This was our favorite town with a ski town vibe and some great but expensive outdoor stores. There are many tour companies here along the main street to set you up with organized tours, and it also has a very helpful information office that enables you to do-it-yourself. Adventure Perito Moreno Glacier is an easy day trip from El Calafate, Argentina. It’s about 1.5 hours from the town to the entrance of the park then another 45 minutes to the glacier parking area. There’s a big touristy area with gift shops and a cafeteria. To enter the Parque Nacional Los Glaciers as a foreigner, it’s 500 Argentinian pesos (about $30) per person, cash only. Additionally, prices increase in many of the parks during peak tourist season and inflation keeps the price rising so research this ahead of time. We didn’t have enough cash so they let us into the park so that we could exchange US dollars at the gift shop and pay the remainder on our way out of the park. We spent 2 hours walking around the glacier and taking a million pictures. It’s an easy hike on a metal boardwalk with many stairs. Make sure you see the top – you can either walk the entire boardwalk to see it or drive up to the top and view it from there. Lago Roca is a big glacial lake set between snow-capped mountains. It can be tied to a trip to Perito Moreno as either a picnic or camping spot but it would be a long drive (45 mins on dirt roads) just to eat. It’s a pretty drive with flamingoes in the small lakes and many other critters running around (geese, rabbits, foxes, rheas (a large emu / ostrich type bird), guanacos, and livestock). You get some huge panoramas of the mountains and the sunset is stunning. There are 2 campgrounds here – one free and one that costs something during the high season but was empty when we were there. The wind here makes cooking difficult so pick a spot with trees. We camped here for one night. It took us about 1.5 hours to return to El Calafate from Lago Roca. Food Great food, breweries, and coffee! Expectedly high prices but everything we found was solid. The cafes here have good Wi-Fi, real coffee, and big breakfasts. Campervan I’d recommend parking one street back from the main strip where it’s quieter. Parking is all free. This is a very pleasant and welcoming town for tourists, just please be respectful so that they don’t kick out the campervans like other towns! Transit to El Chaltén Driving to El Chalten takes about 3.5 hours. It’s a stunning drive with many great pull offs for photos. If you end up taking a bus, you’ll miss a lot of the photo opportunities but you’ll still see plenty of the mountains in El Chalten anyway!
El Chaltén El Chalten is a small town built for Los Glaciares National Park. The trailheads for the park’s primary hikes start in the town itself. It’s a very expensive town that’s gone all in on tourism. Oddly though, they didn’t seem very welcoming. Granted we were there early in the season, but we kept getting what felt like the cold shoulder. It may also be that they don’t like budget travelers. Regardless, this is a can’t miss town for the awesome mountains and hikes. Make sure to stop into the Ranger Station at the entrance to the town. The rangers there are very knowledgeable and gave great recommendations for hikes and trail conditions. They also have lots of maps and spoke great English. Their office was open from 10 to 5 but may have longer hours during busy season. Some hikes require permits which can be obtained from this office. There is one outpost gas station at the entrance to town and I would make sure to pull out any cash you’ll need from another town as El Chalten is notorious for empty ATMs. Adventure The Mount Fitz Roy hike from El Chaltén takes about 9 hours. It’s an out and back hike that takes you to a glacial pool far above the tree line. As with all of Patagonia, the earlier you leave, the better chances you have of a cloud free view. All in all, the odds are against you for a clear view. We were exceptionally lucky, and we were also the only people to make it to the top that day due to the ice. Later in the season, you wouldn’t have a problem with ice though. See this video for our end-of-the-trail celebration!
The Las Torres hike from El Chaltén takes 5 hours but we rushed because the peaks were completely covered by clouds by the time we made it to the top. The trail is not very challenging with a lot of rolling hills and a few steep parts. Be prepared for lots of mud though.
Food Rancho Grande was the best food we found in the town. It’s a 24 hour diner style hostel but their french-fries, steaks, and pizza was good (in that order). Most other places were either still closed for the season or didn’t open until 7 pm which was nearly our bedtime after the long hikes. Campervan This town hates campervans. Campervans are banished to an uneven dirt parking lot at the very end of town. There are no facilities here but it does have a spigot for drinking water. The site was so windy that our doors kept blowing open enough to trigger the interior lights which made for a tough sleep. We ended up squeezing our van in between some tour company vans on the street and got away with it but I don’t think you will during the busy season. Instead, there are 3 or 4 good pull off spots about 15 km (30 minutes) out of town down the dirt road towards Lago del Desierto. There are many no campervan signs along the road out of El Chalten but continuing past these obnoxious things leads you to greener pastures for your camper. These unmarked spots are protected from the wind, secluded in the bushes a little off the road, and have great views of Fitz Roy and a river nearby with drinkable water! As a side note, the Rancho Grande hostel in El Chalten sells hot showers for about $1 – a great buy. Transit to Puerto Natales Driving from El Chaltén to Puerto Natales takes 5 to 7 hours depending on gas needs and also crosses the border from Argentina to Chile.
Puerto Natales Puerto Natales is a good spot to restock and regroup. It’s a larger town with good groceries and laundry places. The Ranger Station/information center in town is a waste of time. They don’t have reliable information about the park and ended up giving us bad information about boat times. The parks in town have free Wi-Fi, but it’s slow and spotty. The waterfront is very pretty though with many swans and giant snow-capped mountains in the distance. Adventure Puerto Natales is the closest town to Torres del Paine and the hub of tourist companies in the region. There’s not much to do in the town itself. Each morning before sunrise, a train of passenger vans leaves town to the park and returns after dark. It makes for a long day with a lot of drive time. There is one neat museum dedicated to the Milodon, a giant sloth from cave men times. If you like the movie Ice Age, this is a worthwhile spot to check out. It costs only 2,000 Chilean pesos ($3.20 USD) and provides about an hour of entertainment. They have some massive caves where the skin of one of these giant sloths was found well preserved in the 1800s. Food Food is mediocre and generic here. The best spot we found was called Mesita Grande and we went there more than once for some great pasta and pizza. Campervan The central park of town is well lit and has a police station at one corner. This is a safe area of town with good food, brews, and coffee around the square. Parking is free and no one bothers you here. A pro move is to grab a spot in front of a good looking restaurant or café, eat there, get their Wi-Fi password, and camp out on the street with Wi-Fi! Transit to Torres del Paine From Puerto Natales, it’s 1.5 to 2 hours get to Torres del Paine depending on the entrance you want to get to. The roads are recently paved and scenic, but get a bit old after going back and forth from the park day after day. Torres del Paine Torres del Paine (TDP) is probably the most popular and representative place in Patagonia. It’s a large park that take about a half day to cross. It’s not nearly as big as Yellowstone, but certainly has 3+ days of activities. The roads are pretty bad so travel around the park is slow. Also, English is uncommon in the park, so some basic Spanish is helpful. Entry to the park is not cheap. We came in the early shoulder season and the price was 11,000 Chilean pesos ($18) per person. Prices change, but for the 2017/18 high season, the price doubles. I’d recommend having this in cash because credit card is not widespread and connectivity is fickle. It’s not clear whether this is the price per day or for a few days. From what we were able to collect, it varies whether you have to pay each day or could just get stamped back in again without paying. We entered the park twice and the second time (2 days later), the man just stamped the back of our receipt with the new date. One of many unknowns. Adventure One of the main hikes that you’ll hear about is the W. It’s a 4 to 5 day trek that is probably the #1 hike of Patagonia. There are multiple free online guidebooks that go into heavy detail about this trek. We aren’t that hardcore and didn’t have the gear for a multi-day trek so we stuck to day trips. There are plenty of other hikes in the park and with a vehicle, you can string together multiple smaller hikes to build a solid 4 days of hiking. Park ranger offices for TDP were largely unhelpful and even gave us incorrect information about the boat times. Instead, we resorted to driving around the park to show up at the location and get reliable information.  Originally, we’d hoped to hike 2 of the 3 legs of the W hike by taking the ferry to one of the legs and driving to the other. The absurdly high price of the ferry coupled with limited shuttle times during the shoulder season caused us to swap the western leg of the W for the more pricey Glacier Grey boat trip. For the Glacier Grey boat trip, we took a boat from Hotel Lago Grey right up to the glacier. Contrary to its name, the glacier is full of stunning blues. It’s a half day adventure with some hiking, boating, drinking cocktails with glacial ice, and hundreds of pictures.
Check in and pay at the hotel, drive a bit farther down the road, and then walk 45 minutes along the lake’s rocky beach to where the boat is docked. If you have extra time, you can walk to the lookout on an island where you can peer at the glacier from afar. The boat ride is about 3 hours and takes you to both sides of the glacier. You also get a cocktail made with glacial ice! The base of the Torres hike (eastern leg of the W trail) was a long day with some shin splint making miles covered. This hike takes you from the touristy lodge at the bottom to the glacial pool right underneath the iconic Torres (towers). From this lake, you can hear the rocks tumbling down the slope into the pools and it’s so loud due to the echoes that you’d think the towers were crashing down. Hike took all of 8 hours to get to the pool and back. Absolutely start as early as you can for a better chance of a cloud free view. Shoot to arrive in the parking lot at 8 AM. That will also put you a solid hour ahead of all of the tour vans so the trails and view points aren’t quite as crowded.
TDP lookout hikes are prolific in the park. You could make a whole day or longer out of hour long overlook hikes. Honestly, they’re nice hikes to beautiful panoramas. We highly suggest the Pehoé Lookout as one that you include (see picture in the section at the end) – it’s a 45 minute hike up from the Pehoé campsite. Fit as many of these in as you can! Food There are very limited food options within the park. There are a couple of fancy restaurants but no convenience stores or inexpensive food options. I’d bring in all the food you plan to need while in the park or treat yourself to a nice white table cloth lunch! Campervan You have to pay at least $30 per night to camp inside of the park with a campervan. No camping along the roads. It’s highway robbery! The park is so big that you burn a lot of time and gas to get in an out to camp in free road spots. I think it’s worth it to bite the bullet here and buy a camping spot for protection from the brutal winds and…hot showers! However, plan to keep your nights here to a minimum since it’s so expensive. There may be some decent road spots on the outskirts of the park but we didn’t search for them. There are free campsites, but they are all on trails that you can’t drive to. We stayed at the Pehoé camping zone near Condor Lookout. It was $16 per night per person (other prices for families) but it’s expensive. Transit to Ushuaia This is a tough, long drive with a lot of variables that could cause significant delays. You have to cross the border from Chile to Argentina and take a sketchy ferry. Start this trip early in the morning and be prepared for long waits at the ferry.
Ushuaia Ushuaia is the end of the world and they like this status. The city has a frontier edge to it with massive ice breaker ships in the harbor ready to cut to Antarctica. This city has a lot of entertainment and could easily soak up a week if you have the time. Adventure Ushuaia is full of options but they range from expensive to really rich. During the high season, there are many boat tours that take you around the islands to see whales, penguins, and seals. You also have many tours that take you into Tierra del Fuego National Park. This park has some stunning scenery but the mountains aren’t quite as jaw-dropping as Torres del Paine. Unfortunately, we weren’t able to get far into the park because of a late season blizzard that turned the roads into demolition derbies. With all the snow, we got to ski in fresh powder at Cerro Castor, a big ski mountain only 30 minutes outside of Ushuaia. Lift tickets and full rentals for both of us costed only $100 per person. The resort shuts down about mid-October for the summer. At this ski resort, we ran into the French and Russian Olympic ski teams. They had their own slopes to train on for slaloms. This was a great resort with no trees to worry about and plentiful chairlifts. It’s a challenging place though with only 1 bunny hill and a couple greens. Most of the slopes are blacks. There’s nowhere to stay overnight here but the resort did have great restaurants and bars. Food Food here is brutally expensive. If you skimp, you’ll get bad food…sorry. If you spend a lot, you’ll get ok food. Hamburgers are very popular and can be hit or miss. They’re really into king crabs here. We didn’t find any great spots to eat, unfortunately. Campervan Parking in this city is free but mostly busy street parking. The waterfront between downtown and the tourist boats has many levels of open air parking from the water’s edge to the first row of buildings. The wind isn’t bad here but I recommend choosing a spot that isn’t on the main road to avoid noise and snow from snow plows. There is also a campground about 20 minutes outside of town along the main road. It was totally snowed in when we were there but looked nice from afar but also didn’t appear to have any facilities or cost anything. This is unconfirmed though. Transit to Punta Arenas Driving from Ushuaia to Punta Arenas took about 9 hours and crosses the border from Argentina to Chile and requires the same ferry again. Make sure to fuel up before leaving Ushuaia. 14. Day-by-day itineraryOur next stop was Buenos Aires, so we took a bus from Punta Arenas to Rio Gallegos (4.5 hours). The flights from Rio Gallegos to Buenos Aires were much cheaper because the origin and destination are in the same country. However, as we found out the hard way, they often cancel the flights out of Rio Gallegos due to low passenger numbers. We were stranded in this town for a couple days waiting for a flight. 15. PhotosPerrito Moreno Glacier: 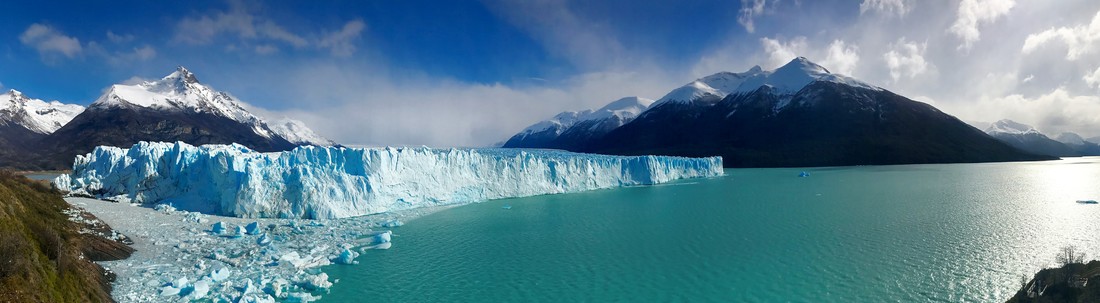 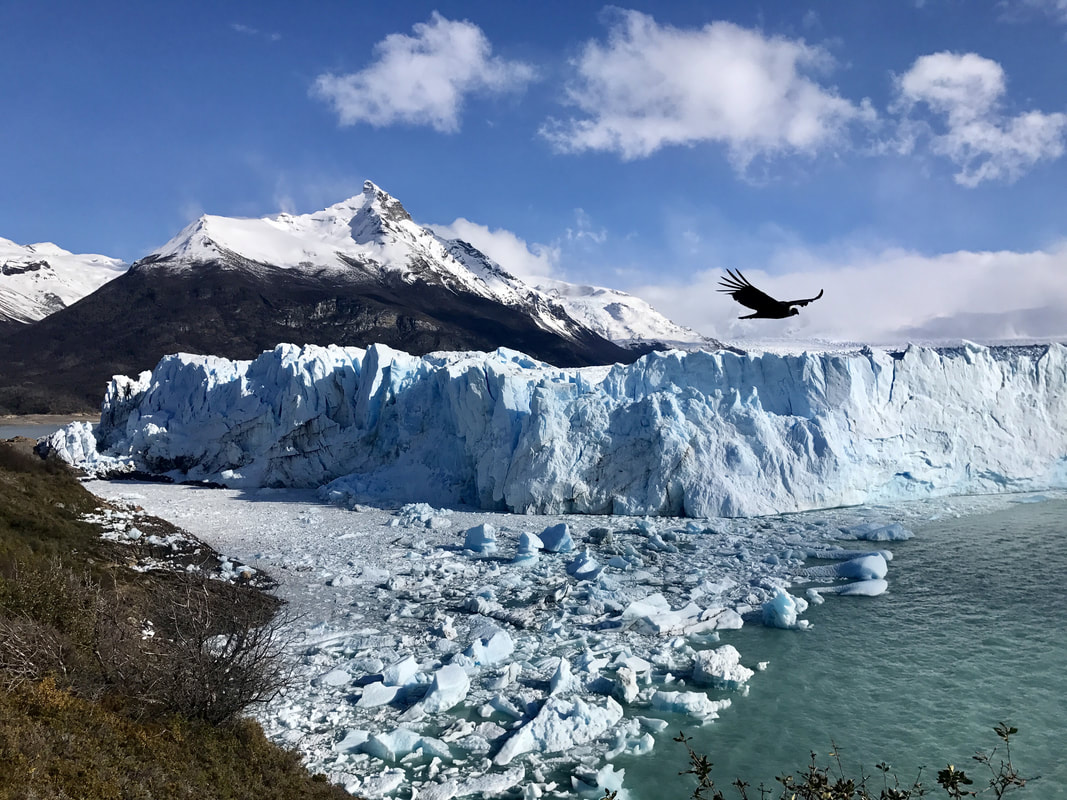 Lago Roca: 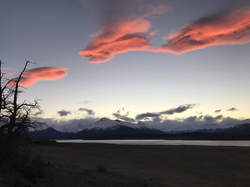 Driving into El Chaltén:  Mount Fitz Roy hike: 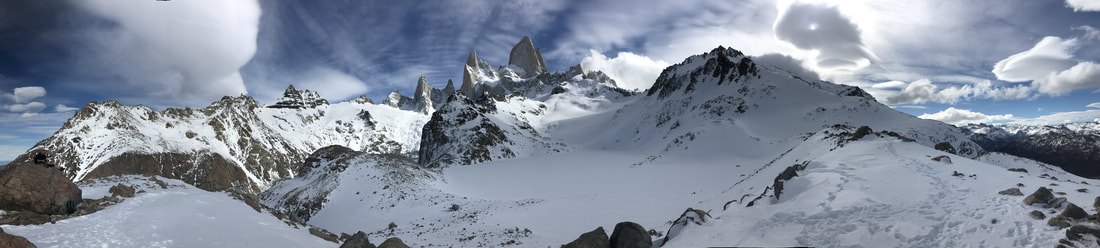 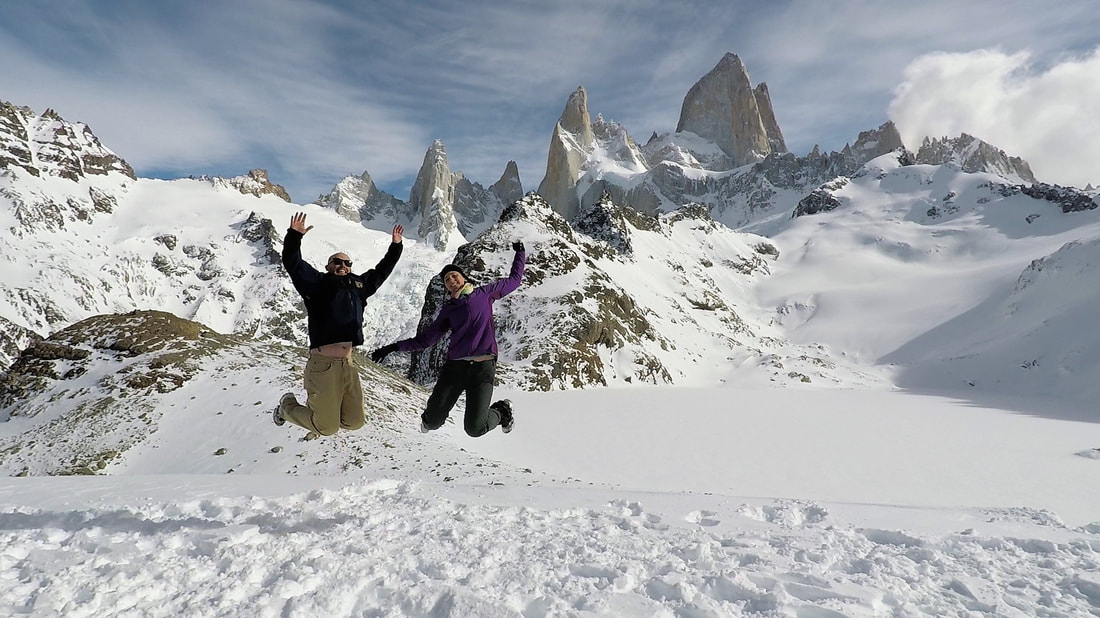 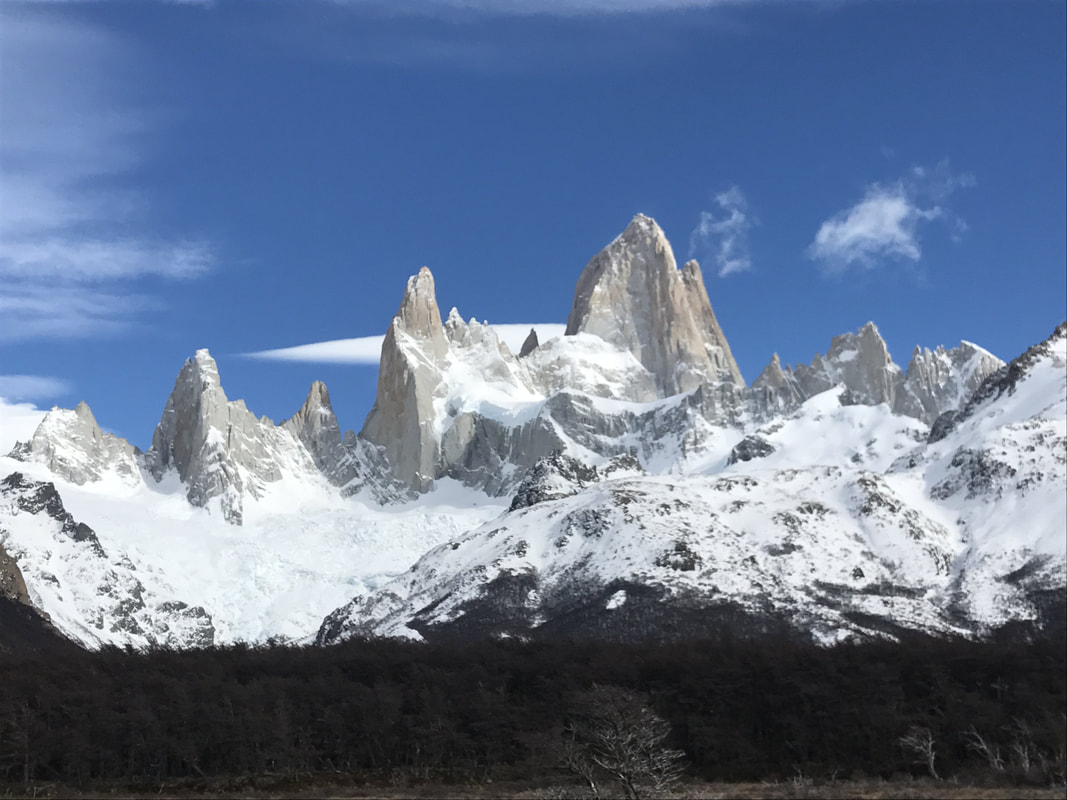 Las Torres hike: 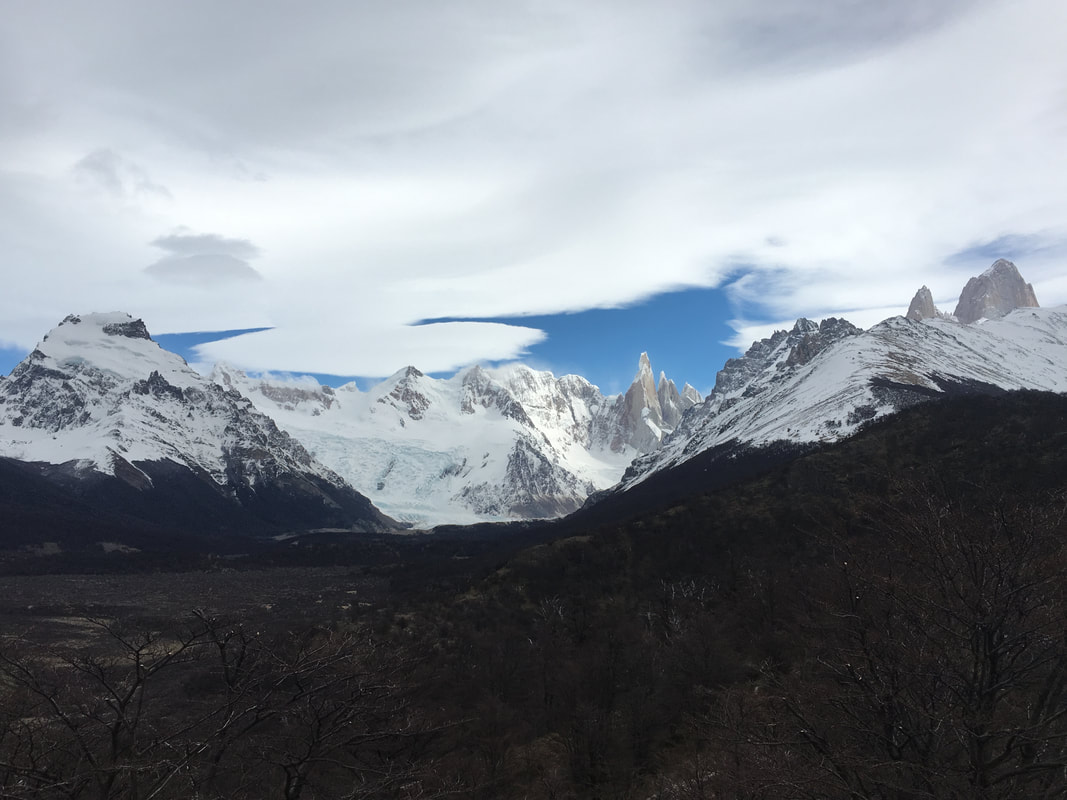 Lago Desierto: 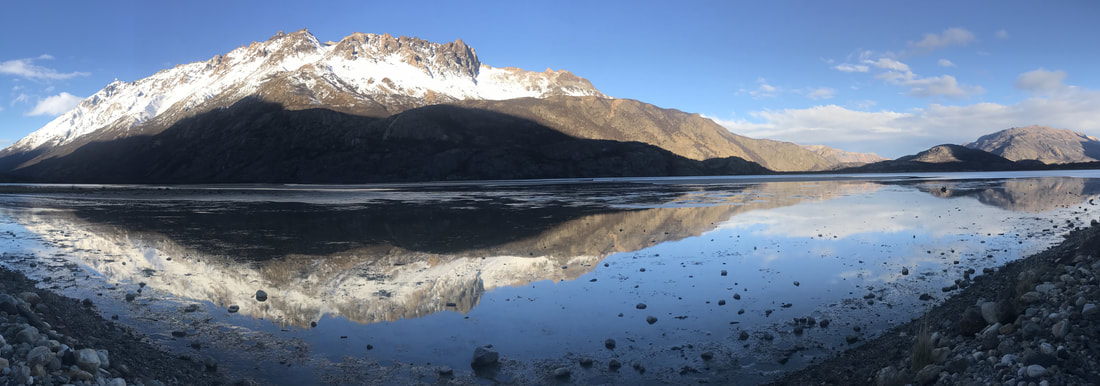 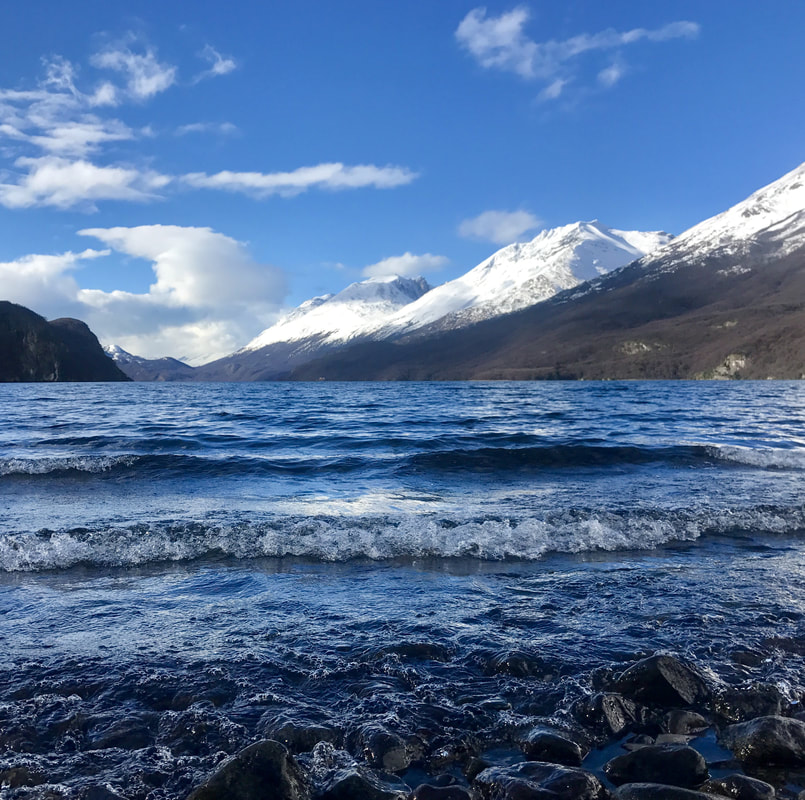 Glacier Grey boat trip: 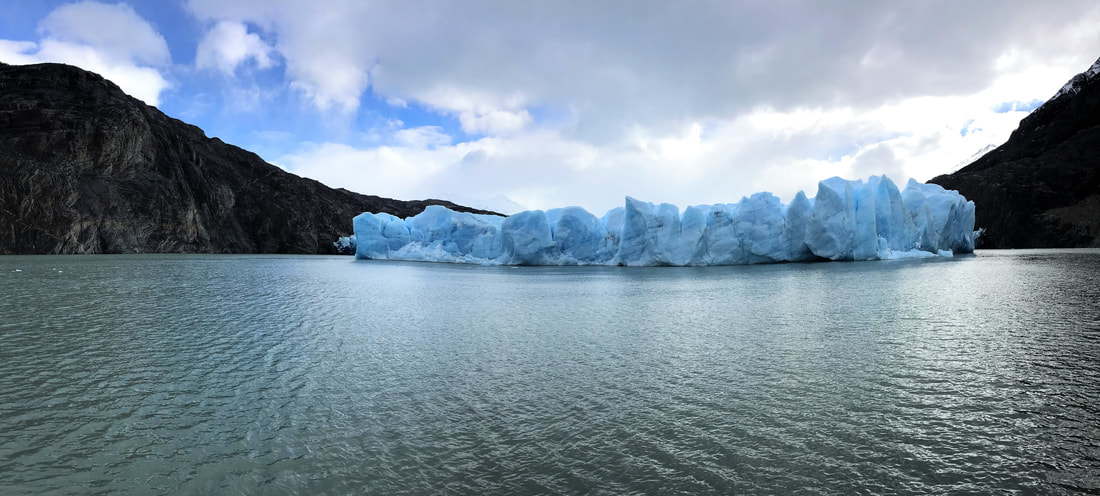 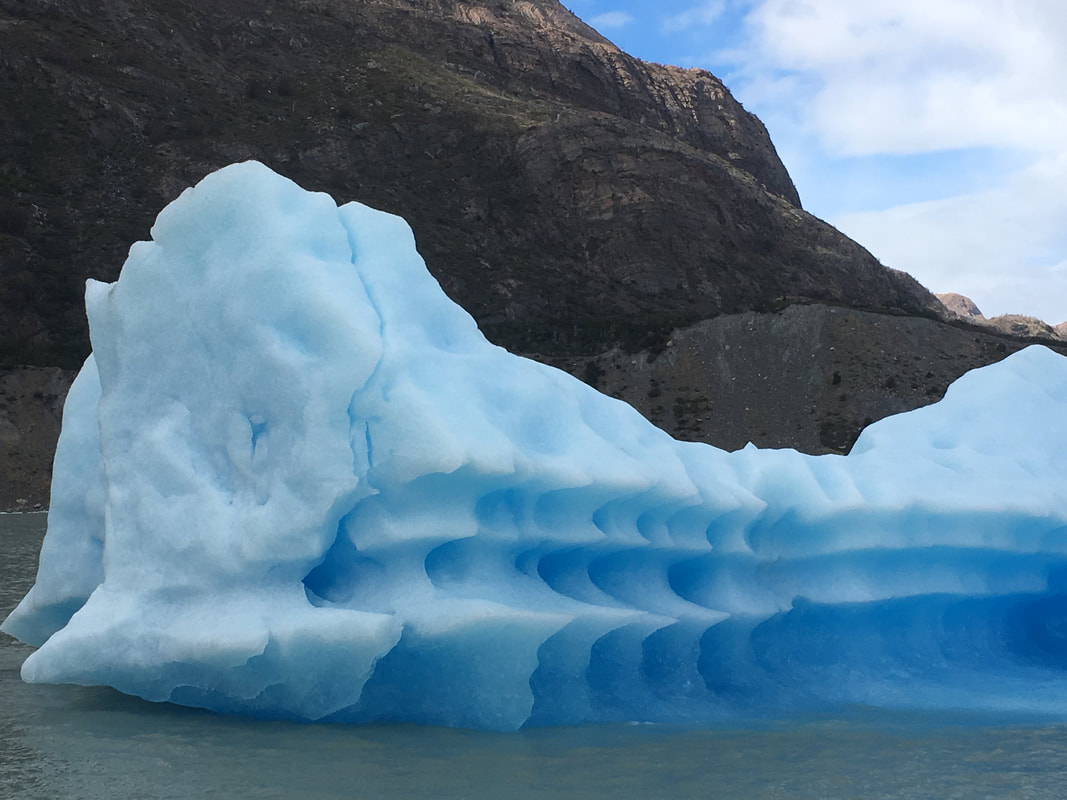 Driving into Torres del Paine at sunrise:  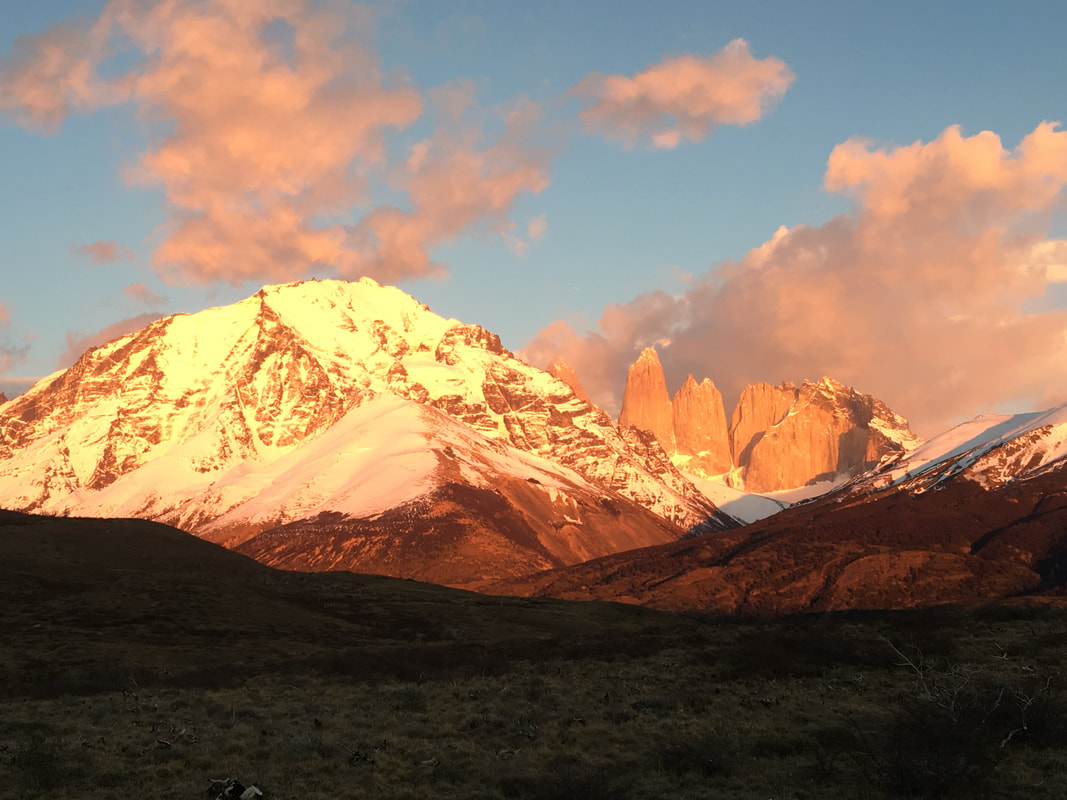 Pehoé Lookout (Torres del Paine National Park): 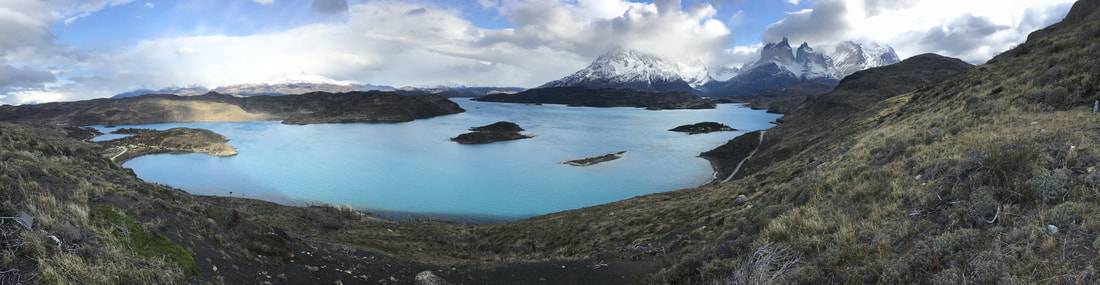 Torres del Paine hike to the base of the Torres: 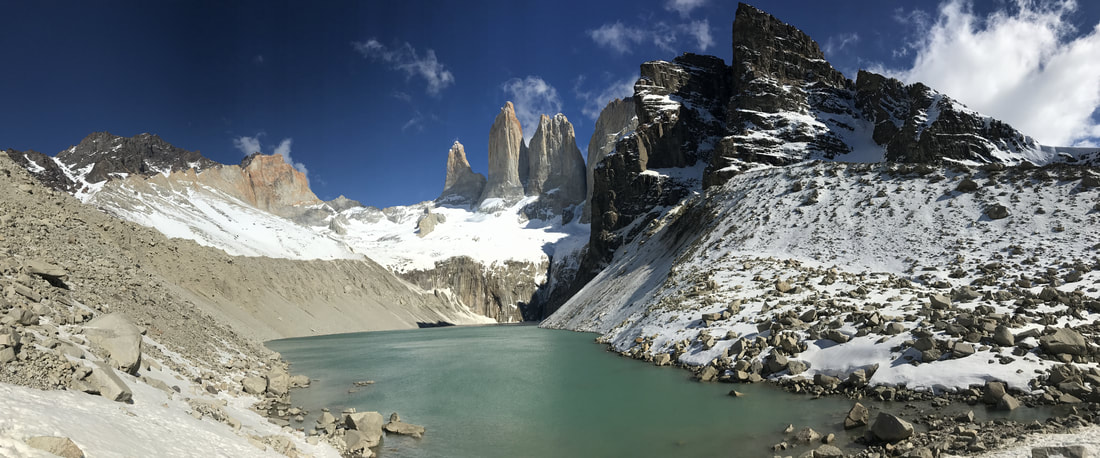 Skiing at Cerro Castor: 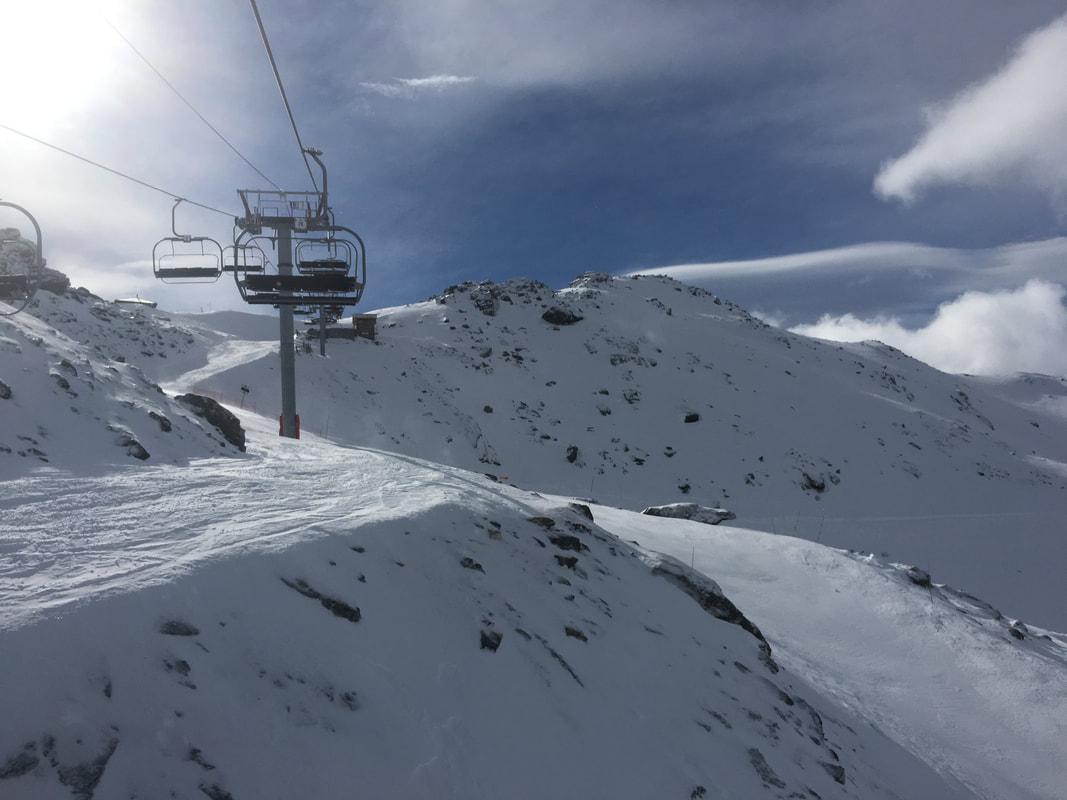
2 Comments
Hey guys - thanks for such a detailed and informative post. As a fellow blogger I can appreciate how much time and effort it must have taken to put this together!
Hendrik
8/2/2019 06:41:34 am
Thank you for this detailed post about road tripping Patagonia in September! We are planning to go in September this year and couldn't find much info elsewhere. Just one question: How were the road conditions like? Would you have felt safe going in a regular 2WD? We are still struggling with the decision which campervan to rent. Leave a Reply. |
Sara & ColinWe are figuring out our travel as we go along, and we'd love to help you out with yours! Here are some tips, tricks, and how-to guides. Categories
All
Archives
January 2018
|
